


Flutter: Internationalization & Switching Locales Manually
At times you will have to make your Flutter app support different language or “locale” or in other words make your app Internationalized. Flutter provides widgets & classes that help with this and the Flutter libraries themselves are internationalized. In the following tutorials we’ll use the APIs and tools provided by the intl package. If you’re new Dart’s intl package, i suggest you have a look at the Dart intl tools.
As you might know Flutter is now taking over vast majority of market, so if you’re a software developer there is 99.9% chance that you will come across this. So here’s an easy step by step tutorial for internationalization of your flutter app, also we’ll see how to manually switch your App’s Locale on specific events. I’ll assume you know how to setup a flutter app so we’ll skip that part. All right then Avengers! Assemble!!
So first step is to Include the packages in pubspec.yaml file. For that just add the 2 packages name under the dependencies. It would look something like this.
dependencies:
  flutter:
    sdk: flutter
  flutter_localizations:
    sdk: flutter

  intl_translation: ^0.17.1
After you save this, flutter automatically downloads and include the packages. You can now use it in your app anywhere simply by importing it. We’ll import it in the main.dart file first. Go to you main.dart file and add import the package.
import 'package:flutter_localizations/flutter_localizations.dart';
import 'package:intl/intl.dart';
void main() => runApp(MyApp());
The next step is to setup the Localization delegates in your main.dart file. For that you need to specify the 2 delegates first.
  Widget build(BuildContext context) {
    return MaterialApp(
      localizationsDelegates: [
        GlobalMaterialLocalizations.delegate,
        GlobalWidgetsLocalizations.delegate
      ],
      supportedLocales: [
        const Locale('en', 'US'),
        const Locale('de', 'DE')
      ],
      ...
GlobalMaterialLocalizations.delegate provides localized strings and other values for the Material Components library. GlobalWidgetsLocalizations.delegate defines the default text direction, either left to right or right to left, for the widgets library. As you can see here, we added 2 lists to our Material app localizationsDelegates & supportedLocales. The supportedLocales parameter holds the list of languages that our app will support. Here you will specify list of languages_codes.
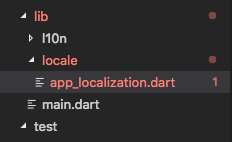
Create a file on path /lib/locale/app_localization.dart
Next step is to create an AppLocalization & AppLocalizationDelegate. Classes in which we’ll be defining our keywords and their translations. We’ll also use it throughout the app and for manually switching the Locale if required. Therefore i suggest you create this class in a Separate folder in your lib directory. Mine looks like /lib/locale/app_localization.dart The App Localization class will only have 2 static methods for now. The load() & of() method.
import 'package:flutter/material.dart';
import 'package:intl/intl.dart';

class AppLocalization {

  static Future<AppLocalization> load(Locale locale) {
    final String name = locale.countryCode.isEmpty ? locale.languageCode : locale.toString();
    final String localeName = Intl.canonicalizedLocale(name);
    return initializeMessages(localeName).then((_) {
      Intl.defaultLocale = localeName;
      return AppLocalization();
    });
  }

  static AppLocalization of(BuildContext context) {
    return Localizations.of<AppLocalization>(context, AppLocalization);
  }

  // list of locales
  String get heyWorld {
    return Intl.message(
      'Hey World',
      name: 'heyWorld',
      desc: 'Simpel word for greeting ',
    );
  }
}
PS: NOTE THAT YOUR load() might be returning an error on the line: return initializeMessages() ignore this for now, we’ll remove it in a while.

load() : It will load/set all the Localized values. You can also call this method if you wish to switch the locale of app manually.
of() : This method will return the instance of current Localization of the app. Somewhat like a factory method.
get heyWorld: This getter returns the value of the heyWorld. This property is what will be using to get its translations based on locale of the app. For demo purpose i have only set 1 String as for now but you can as many as you can.
Create a AppLocalizationDelegate in the AppLocalization class
Now create an AppLocalizationDelegate for the AppLocalization class.
class AppLocalizationDelegate extends LocalizationsDelegate<AppLocalization>{
  final Locale overriddenLocale;

  const AppLocalizationDelegate(this.overriddenLocale);

  @override
  bool isSupported(Locale locale) => ['en', 'de'].contains(locale.languageCode);

  @override
  Future<AppLocalization> load(Locale locale) => AppLocalization.load(locale);

  @override
  bool shouldReload(LocalizationsDelegate<AppLocalization> old) => false;
}
As you can see this Delegate class is extended from main LocalizationsDelegate and we have pointed it to AppLocalization via <AppLocalization> add the above required methods and take a look at the isSupported() method:
@override
bool isSupported(Locale locale)=>['en','de'].contains(locale.languageCode);
This method will be called to check if the language is supported or not, based on the Locale instance provided. Make sure to you have your supported languages inserted in this list here such as: [‘en’, ‘de’ ….]
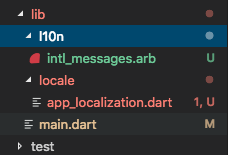
Create a lib/l10n Directory in your lib folder
Now create a l10n directory in your lib folder. This directory will hold all the translated values as per your Locale. Your final directory structure will look somewhat like this:
Create resource bundles (.arb files)
In your Terminal and run the following command to create the arb files:
$ flutter pub run intl_translation:extract_to_arb --output-dir=lib/l10n lib/locale/app_localization.dart
You will now see a new file in your l10n folder intl_messages.arb . Cool!
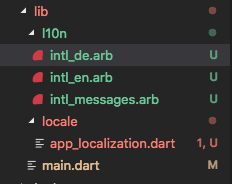
NOTE: The Dart intl package only creates one template file of .arb from your Localization class and names it intl_messages.arb. From here you now have to manually create other resource files with convention intl_[LANGUAGE_CODE].arb and copy the content of intl_messages.arb directly with updated the values.
For eg: For English format you will create file intl_en.arb and the content copied from intl_messages.arb :
{
  "@@last_modified": "2019-06-27T22:25:57.081431",
  "heyWorld": "Hey World",
  "@heyWorld": {
    "description": "Simple world for greeting ",
    "type": "text",
    "placeholders": {}
  },
}
Now lets create one in German language. So this will be:
{
  "@@last_modified": "2019-06-27T23:38:38.868199",
  "heyWorld": "Hey Welt",
  "@heyWorld": {
    "description": "Einfaches Wort zur Begrüßung",
    "type": "text",
    "placeholders": {}
  }
}
Once you created these files in your l10n folder. Now you need to run another command to create the corresponding .dart files that will be used to manage these resource files. For that run the following command:
$ flutter pub run intl_translation:generate_from_arb \
--output-dir=lib/l10n --no-use-deferred-loading \
lib/l10n/intl_messages.arb lib/l10n/intl_de.arb lib/l10n/intl_en.arb lib/locale/app_localization.dart
NOTE that i have only 2 files intl_en.arb & intl_de.arb therefore i am only passing those in command. But if you have more or less you need to pass them all.
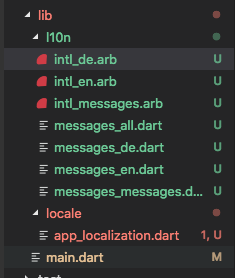 Now check your l10n folder you will now see new dart files created from those resource files. Btw you might see some warnings in the console, but its ok. just ignore them.
Now import the messages_all.dart file in your AppLocalization Class and here’s a final look at your AppLocalization Class:
import 'dart:async';
import 'package:flutter/material.dart';
import 'package:intl/intl.dart';
import '../l10n/messages_all.dart';

class AppLocalization {

  static Future<AppLocalization> load(Locale locale) {
    final String name = locale.countryCode.isEmpty ? locale.languageCode : locale.toString();
    final String localeName = Intl.canonicalizedLocale(name);
    return initializeMessages(localeName).then((_) {
      Intl.defaultLocale = localeName;
      return AppLocalization();
    });
  }

  static AppLocalization of(BuildContext context) {
    return Localizations.of<AppLocalization>(context, AppLocalization);
  }

  String get heyWorld {
    return Intl.message(
      'Hey World',
      name: 'heyWorld',
      desc: 'Simpel word for greeting ',
    );
  }
}

class AppLocalizationDelegate extends LocalizationsDelegate<AppLocalization> {
  final Locale overriddenLocale;

  const AppLocalizationDelegate(this.overriddenLocale);

  @override
  bool isSupported(Locale locale) => ['en', 'es', 'de'].contains(locale.languageCode);

  @override
  Future<AppLocalization> load(Locale locale) => AppLocalization.load(locale);

  @override
  bool shouldReload(LocalizationsDelegate<AppLocalization> old) => false;
}
The error is gone! right. ;) Now you’re just 1 step from using the language values based on your current Localization. To use language specific text in your app, you’ll simply need to follow the 2 steps :
- import App Localization class where you want to use the text
- Call localized value of text via:
AppLocalizations.of(context).heyWorld
Now what is happening here is when you call the above method, it calls the getter of the AppLocalization class and returns its value based on the Locale of the context. Which means..
If the context is en (ie english) it will return the value from intl_en.arb and when the Locale changes to de ( ie german) it will return the value from intl_de.arb. And since we’re using only Class getter for both languages ie heyWorld therefore need not to worry about the that as well. Flutter will take care of that. Now here comes the best part.
Finally update main.dart file
In your main.dart file and in your main Class set a new property _localOverrideDelegate in the _MyAppState and give it a default initial value:
AppLocalizationDelegate _localeOverrideDelegate = AppLocalizationDelegate(Locale('en', 'US'));
later we’ll be changing the state of Locale on custom event. Now add this parameter in the list of _localizationDelegates in your main file.
return new MaterialApp(
        ....,
        localizationsDelegates: [
        GlobalMaterialLocalizations.delegate,
        GlobalWidgetsLocalizations.delegate,
        _localeOverrideDelegate
    ],
    home: Scaffold(...
That’s it! you’re all set to use you language files code. Now each place where you’ve used the convention: AppLocalizations.of(context).[GETTER_KEY] the text will return the Localized value always. Now here’s the best part!
Switch the AppLocalization on custom events
To switch the Localization is real easy now. You only have to call the load() method with the instance of Locale([LANGUAGE_CODE], [SUBTAG]) as argument. Like this.
For English US:
    AppLocalization.load(Locale('en', 'US'));
For German DE:
    AppLocalization.load(Locale('de', 'DE'));
Pretty easy! right. And yes, you can call it on onPressed() events on buttons or any other.
Lets see a working example I’ll be switching the app Localization on click of a button. I’ll be adding a simple 2 buttons on the page and a heyWorld text in the center. On click of button the AppLocalization will switch over. 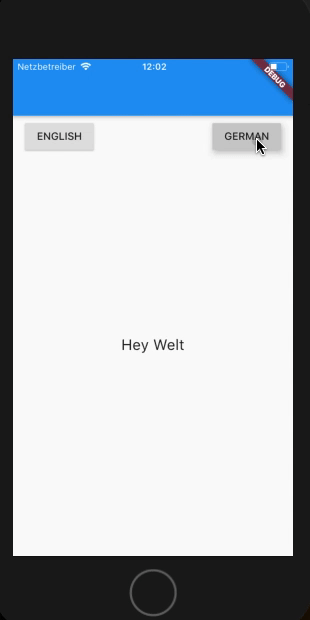
Here is snippet of my main.dart file
import 'package:flutter/material.dart';
import 'package:flutter_localizations/flutter_localizations.dart';
import 'locale/app_localization.dart';
import 'package:intl/intl.dart';

void main() => runApp(MyApp());

class MyApp extends StatefulWidget {
  @override
  State<StatefulWidget> createState() => _MyAppState();
}

class _MyAppState extends State<MyApp> {
  // This widget is the root of your application.
  AppLocalizationDelegate _localeOverrideDelegate =
      AppLocalizationDelegate(Locale('en', 'US'));

  @override
  Widget build(BuildContext context) {
    return new MaterialApp(localizationsDelegates: [
      GlobalMaterialLocalizations.delegate,
      GlobalWidgetsLocalizations.delegate,
      _localeOverrideDelegate
    ], supportedLocales: [
      const Locale('en', 'US'),
      const Locale('de', 'DE')
    ],
    home: MyHomePage());
  }
}

class MyHomePage extends StatefulWidget {
  @override
  State<StatefulWidget> createState() => _MyHomePageState();
}

class _MyHomePageState extends State<MyHomePage> {
  @override
  Widget build(BuildContext context) {
    return Scaffold(
      appBar: AppBar(
          // title: Text(AppLocalization.of(context).heyWorld),
          ),
      body: Column(
        mainAxisAlignment: MainAxisAlignment.start,
        children: <Widget>[
          Expanded(
            flex: 1,
            child: ListTile(
              leading: RaisedButton(
                onPressed: () {
                  setState(() {
                    AppLocalization.load(Locale('en', 'US'));
                  });
                },
                child: Text('ENGLISH'),
              ),
              trailing: RaisedButton(
                onPressed: () {
                  setState(() {
                    AppLocalization.load(Locale('de', 'DE'));
                  });
                },
                child: Text('GERMAN'),
              ),
            ),
          ),
          Expanded(
            flex: 1,
            child: Text(
              AppLocalization.of(context).heyWorld,
              style: TextStyle(fontSize: 20),
            ),
          )
        ],
      ),
    );
  }
}
and here is the link to full working example. Enjoy and Keep Fluttering!
abcdevops © 2019 all rights reserved.